
The fourth step in the shot sequence: consistently maintaining your best archery anchor point
If you’ve followed this shot sequence guide, you should understand how to maintain a consistent stance. You also know how to hold your bow properly and how to draw your bowstring correctly. Finding your best anchor point is the next integral step to the archery shot sequence.
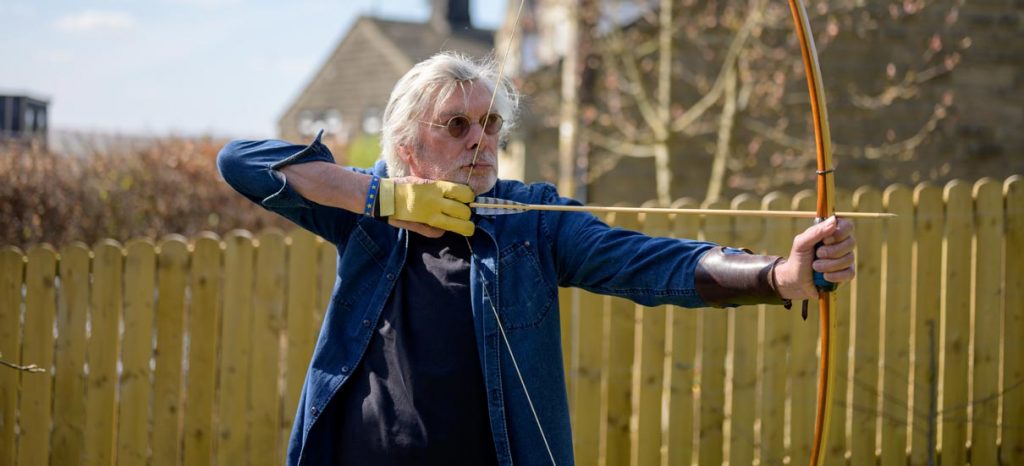
Before you think about hitting a target, you must first become comfortable with holding the position of your bowstring once you have pulled the string back to capacity. This is what is known as the ‘full draw’.
When at full draw, you need to ensure a part of your bowstring and/or hand makes contact with your body. This is your ‘anchor point’. This exact spot or position must be reached every time you pull the string back to full draw.
The choice of where you pull to and why, will be covered in the guide below.
What is an Archery anchor point?
The anchor point can be seen as a consistent area of contact between your full draw motion and your stance. This acts as a point of reference to ensure consistency in the positioning of your full draw. Which will then build consistency in your shooting.

Getting to your anchor point consistently, in the exact same spot, is integral to proper archery form. The anchor point will typically be a spot on your face or jaw. Remember that all of this only works if you have a bow which properly measures your correct draw length.
Why is an anchor point important for archery?
Pulling the string back to this same single spot must become a routine for every time you draw the bow. Or else you will not be able to hit the target consistently.
This is mostly to do with the aiming process. No matter how hard you aim, if you’re drawing your bow inconsistently, it will not shoot to the same place consistently.
It’s quite simple: if your draw-arm pulls to a random spot every time you shoot, then your shot will also be random!

There is also a strong correlation with a good anchor point and how you are able to see the target during your aiming. The correct principle is that you want to be looking down the arrow, or through the string, to aim. These are reference points that only work when you have a consistent anchor point.
The location of the anchor point itself, is less important than hitting that same spot consistently. Every time your hand goes back in the draw, you want to get it to the exact same location, wherever you choose it to be.
What makes a good anchor point in archery?
A good anchor point is one that will contact as many different body parts as possible.
This ensures you have a solid number of references that help you hit the anchor point consistently. With multiple touch points to your anchor, you’ll also find it easier to align other body parts together in the draw motion.
However, what is feasible and comfortable as an anchor point will also be determined by your bow type and general build. You should look to experiment with what feels like it works best for you. No archer will have the exact same anchor point. You should determine your anchor point by what is comfortable and easiest to repeat.
Remember these key steps to find your best anchor point in archery:
- Make your anchor point static and easy to locate
- The first point of contact from your draw hand is the one which will impact your aim the most
- If you’re aiming over the arrow, you’ll want an anchor point that allows your peripheral vision to see it
- The same applies if you are aiming down a sight, along the side of the arrow, or through the bow string. You will have to adjust the anchor point for each one accordingly
- It is important that your anchor point is loosely in–line with the target. The same as your arrow, draw elbow, shoulders and bow hand. However you should not sacrifice comfort to make this line rigid
- Just relax and shoot straight – rest your hand against your body where it feels right.
Whilst a good anchor point should be comfortable, you must not avoid having the string near your face. The string may feel scary at full draw, but this is essential for good archery form. If your bow and stance is straight, and you have drawn correctly, then the string will have to be close to your face!
What are the most popular anchor points in archery?
Below we’ve gathered a list of the most common anchor points in archery. We’ve also included details on what type of bow or style of shooting they would be best for.
There are some actions which occur across multiple anchor points. The most common you’ll see is the draw hand touching the face. This is a strong point of contact that is easy to repeat.
IMPORTANT TIP FOR BEGINNERS. You must remember all of the previous advice for achieving full draw before you think about your anchor point. Many beginners decide on an anchor point, but then disregard the techniques for a correct full draw.This creates a problem because they are now just focusing on ‘bringing their hand to the anchor point’. For proper archery form, the feeling should be the opposite. You bring yourself to a correct full draw, and practice arriving at the anchor naturally during this process.
Below we will give examples of some archer’s anchor points. Everyone’s natural anchor point will be slightly different. Whilst it can be modified, do not try to ‘force’ a certain type of anchor point when it does not work for your natural full draw.
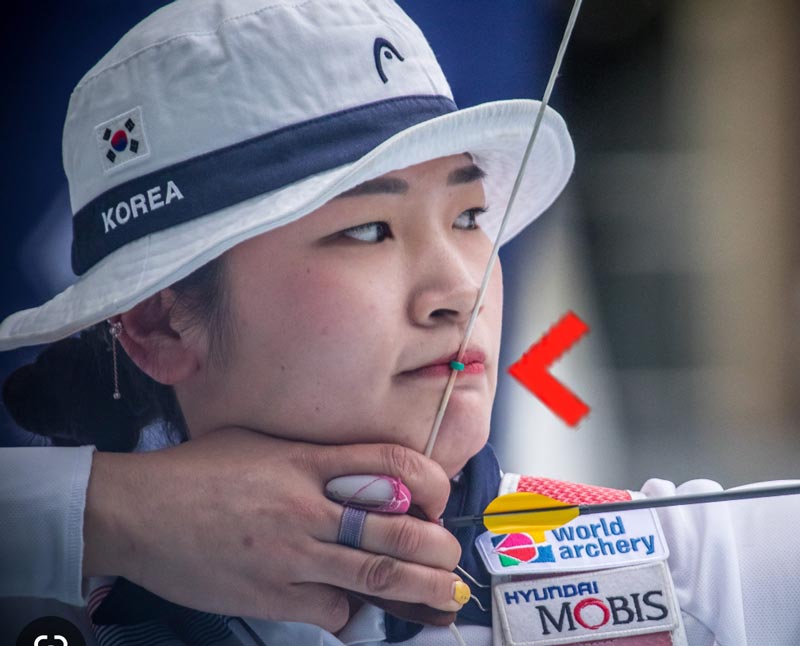
Tip of the nose on the bow string
Many elite archers recommend that the tip of your nose should always have the bow string resting against it when at full draw.
This only works in tandem with some other anchor points below. You will still want to have your draw hand against another reference point.

The tip of the nose on the bow string is very common for Olympic archers that use modern recurve bows. This is mainly because they have peep sights that allow for aiming the shot even when the bow string would normally feel like it blocks the vision of the target.
The other major benefit of this anchor point is that it ensures your bow is vertical at 90 degrees when shooting (i.e not tilting left or right). This is because you can feel how straight the string is on your nose.
Finally, having the bow string on your nose means you can see the string in your peripheral vision. Which acts as an additional reference point. As long as you line up the bow string in your eyeline alongside what you know already leads to an accurate shot. Then every time you are at full draw, you have the bow string in your eyeline as another reference point to align for consistent shooting.
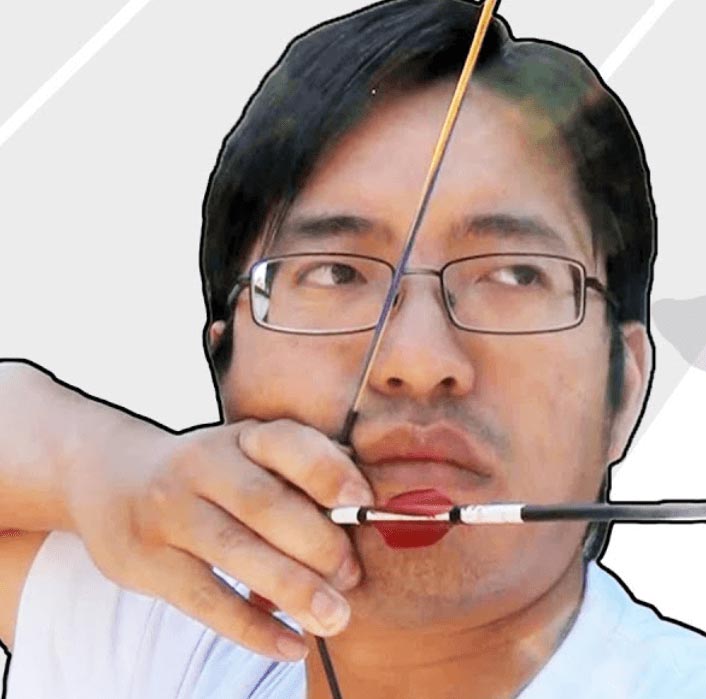
Hand touching corner of your mouth
This is the most common for beginners because it is easy to reach and remember. It can also be reached by almost any bow type. This works particularly well for traditional/basic bows too. It is also a position that does not require much strength to reach.
This anchor point works best when you have a sight attached to your bow. Otherwise you may find the position does not allow you to see the target that well.
As suggested, you want to pull the bow string back until your index finger touches the corner of your mouth with the string. Now don’t actually have the string touching your mouth or else the release may hurt. Get it to that position with the index finger each time, to achieve a solid anchor point.
This usually works well in tandem with the bowstring also resting on the tip of your nose. If you want your anchor point to be higher, you can use your middle or ring finger as the reference point. In particular if you plan to shoot further than 70 metres. If you are using a thumb draw, then the thumb instead of the index will be in the corner of your mouth.
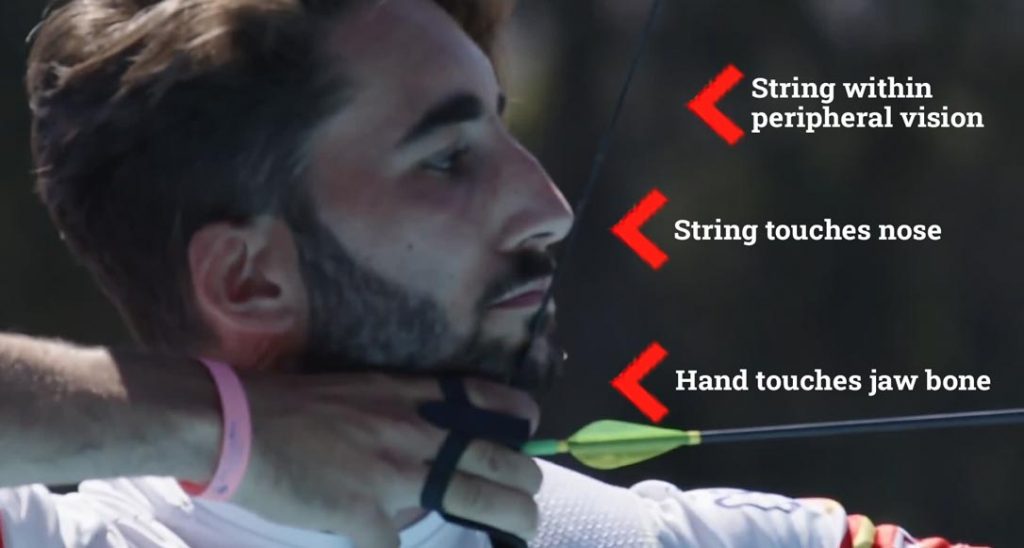
Hand touching under the jaw
This is most common for those who are aiming at targets of 70-100 metres. For example in in Olympic archery or recurve archery. That’s because drawing to this anchor point will result in a lower trajectory. You also have the hand clear of your vision and you can use a tab more easily.

You place the draw hand under the middle area of your jaw, with the gap between your index finger and thumb placed in the crevice of your jaw line.
The under-the-jaw anchor point is difficult to reach because of the strength required. However it can sometimes have up to three reference points. The hand on the jaw, the bow string on the chin or mouth, and then also the bow string on the nose.
The more reference points the better, which is why this is a favoured anchor points among the pros. If you have a release mechanism, it will be your thumb that is the reference point for where your hand should touch the jaw.
Jawline below the ear
This is a common anchor poiin recurve archery. If you have worked out your full draw length and have the correct bow to reach it, then it should be possible to reach your bow-string-pulling hand to the back of your jaw. However, this will require a lot of strength.

The corner of the ‘L’ shape between your draw thumb and finger should hit the corner of your jawline, just below the ear.
Similarly to the ‘under-the-jaw’ anchor point, this position can also allow the string to rest against your face, lips or nose at the same time whilst the hand is clear of your forward vision.
This is also the position of choice when using a finger release or a wrist release. That’s because it makes it easier to reach and is a better angle to have your hand to press the trigger. You may need to rotate your draw wrist and use your index finger as the reference point when doing this.
This is also best for bows without sights, as it allows for accurate aiming down the arrow.
Make sure that with this anchor point, you reach all the way to the back of the neck. Do not stop mid-way and leave a ‘gap’ at the back of your neck. Try to maintain as much contact as possible with the draw hand and your neck.
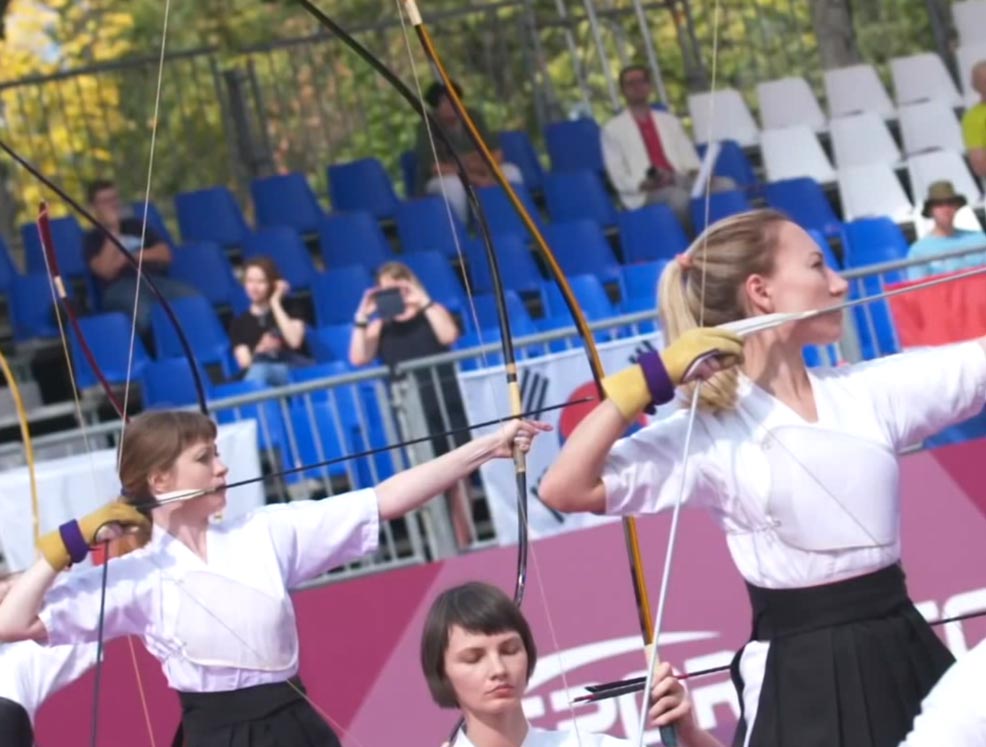
Behind the ear
In traditional Korean archery, the anchor point reaches well behind the ear or in the ‘upper jaw’ area. This is due to the fact that bows in Korean archery are typically traditional and therefore have a larger draw length, weight and size.
With a longer string, there is room to anchor this far behind the archer. This allows for a fourth reference point of the ear area, as well as the neck, face and nose.
On the cheekbone
This is an anchor point that is slightly inbetween the chin and the back of the jaw. However the trajectory here will be slightly ‘higher’ than those two anchor points. It really is all about preference and your individual build!

Riser in your eyeline
Mainly used by recurve archers, this is a reference point based on any anchor point that places the frame of the bow in your vision. This can also be known as ‘string alignment’ as you are lining up the arrow and bowstring in a consistent horizontal direction. This is particularly useful for ‘barebow’ or traditional recurve bows.

Kisser button
Another helpful archery tool that can act as a reference point for some anchors. T
This is literally a little button which is attached to the string. It would be placed on the area you would expect it to reach your lips at the anchor point. Essentially this is a reference for your reference point! So, you know that kissing this button means you have lined up your anchor point correctly. It’s just another tool to help consistency in your shooting.
Peep sight
Common for compound bows, this is (like the kisser button) also a reference for a reference point. However it is even more helpful for aiming. It’s a small circle, usually in recurve archery, that attaches to the upper area of the bow string.

When you already have an anchor point with multiple points of reference, and you are lined up accurately to the target, this mechanism will attach to the string in the area that your eye is looking down the sights of the bow. So you can align peep with the target when all of your other anchor points are aligned.
Release trigger/aid
For compound bows and some advanced recurve bows, anchor points might be different based on your release aid. This is a device on the string that mechanically releases it when you want to shoot the arrow. However, the principles remain the same. You need to draw the string back to its fullest point, and find a place for your hand and bow string to rest against your face/body.

In the example above, you can see how the release aid has a handle that has been drawn to a point at the back of the jawline, with anchor points across the cheek and nose.
Floating anchor point
When you are truly a master of archery, it may be possible to shoot from an anchor point that is not touching the face or body at full draw.
If you can hit every shot accurately from this position, then you may find it is not necessary to be rigid in your choice of anchor. However, for beginners and most intermediate to advance archers, this will be impossible. An anchor point with contact to the body is the best way to repeat and practice your shooting.

Professional tips for all anchor points
As with everything else in the stance, you need to ensure your body position remains the same, every time you anchor.
Most importantly, that your head/face remains the same every time you reach your anchor point. If you move your head, your anchor point would technically change, and your shot would not be consistent.
Here’s a few more pro tips to consider when trying to reach your best anchor point:
Keep it low
Whichever anchor you prefer, a low anchor will always be stronger. It also maintains more body contact, which means more points of reference. It will also allow more strength from your shoulder blades to apply to the draw.
Keep your mouth shut
Try to keep your mouth closed when you shoot, with your teeth together. Breath in through your nose. An open mouth will just add to complications with lining up the bow string as part of your anchor point.
Don’t fear the string
It might feel weird having the bow string next to your face when you know that force of the string is going to release. The first few times it might make you squint, or flinch, and the arrow could go off target. But this is good practice and a fear you must overcome.
It’s good to get used to the feeling that you are only holding the string in place, and letting it go to shoot. Rely on that forward momentum to do all the work. By shooting forward and with the proper stance, the string will never actually hurt your face. Though it may hit your arm if you’re not careful!
The best archery anchor points have bone-to-bone contact
Where you have your hand against your face or neck or jaw, you must try to focus on bone-to-bone contact. Your reference points need to be as specific as possible.
Therefore, whilst one half of the anchor point is where the hand touches your body, you should also focus on which part of the draw hand is making contact. The knuckle, the wrist, the finger? But remember, don’t actually put any pressure on your face or the knock. It is just a tactile connection.
If you cannot find two bones to align on the face and hand, just focus on aligning two identical spots. Ones that you can reach comfortably and repeatedly.
Using equipment will help you find your best anchor point
Whilst typically some archery equipment is not recommended for beginners, we would recommend either a peep sight or a kisser button. They are both simple and massively beneficial to someone learning how to reach an anchor point. This is because they are physical points of reference that do not rely on ‘feeling’ alone.
The peep sight is the best example of this, as you will know exactly where it needs to be to align your anchor point. Every time you go to find your anchor, if the peep sight circle does not see the target, then you know the rest of your anchor point is wrong. Correct peep alignment is proof that you are hitting the rest of your anchor points.
Don’t bring your body to the anchor point
This was mentioned previously but should be re-iterated.
It is sometimes instinctual to bring your head/body/bow towards the string as you pull it, rather than bringing your string to the body.
You know where the anchor point is that you want, so you might try to force the contact by moving your draw stance forwards. You must avoid this!
Don’t search for the anchor point, but let it come to you naturally through achieving full draw.

What is the best anchor point in archery?
Just like your stance, the best anchor point is the one that works best for you!
There is no perfect anchor spot and you may even change yours over time.
Everyone’s anchor point will be different depending on a lot of variables, like your build and your bow.
Of course, the best anchor point in archery for a beginner will most likely:
- Be one that has many reference points
- Have reference points that are physical, bone-to-bone contact
- Easy to replicate
- Be comfortable.
However, there is a more technical argument between experts over which anchor point is ‘best’ for beginners. Mainly this should be the easiest to get to and the easiest to repeat.
In this sense, the corner of the mouth is a great example. Those which have more reference points may require more strength or skill to reach. Try to think in a mechanical way. You should not try constant variation between shots. You must perform the same robotic motion or sequence each time you shoot!
How do you keep a consistent anchor point in archery?
- Pick one that feels comfortable. Different anchor points will work better depending on your style of shooting. You really have to feel your anchor point – it must be what is naturally most comfortable to you
- Reptition. Though strength does play a part, the most vital element to consistency is – you guessed it – repetition!
- Muscle memory. Your body needs to build up a physical memory of where your anchor point is, in order to hit that same spot repeatedly. However do make sure you try to do this only with a live arrow – ‘dry firing’ the bow without an arrow can damage the equipment.
- Don’t change your stance. Keeping your stance and head position in the same place is also key to making sure you get the anchor point correct each time. Even just having your head a few millimetres in a different position means your anchor point will be different. Which means the shot might not be the same.
- Don’t change your anchor before analysing it. And do not try to mix anchor points in the same session. It is recommended to stick with just one anchor point for at least the next 5 sessions of your target practice. It is always good to film your sessions and be absolutely certain that your anchor point has not accidentally changed at one point during your shooting. If your accuracy is not consistent but you are confident your stance is consistent, then you can try a new anchor point to see if it works better.
Common problems in reaching your best archery anchor point
As a beginner, you are bound to face a lot of problems in finding your best archery anchor point. You will struggle for consistency and the strength required for a full draw.
The truth is you will probably need to skip ahead in this guide and learn how to aim and then release the arrow, before you can really nail down your anchor point.
That’s because you must be able to perform a full-draw consistently and comfortably relaxed, before you will really know which anchor point is most comfortable for you as well.
However in the meantime, here’s a few common issues with finding your best anchor point and how to overcome them:
- Can’t get anchor in deep enough. You might find that without bending your wrist, you cannot pull back to your neck area. This is actually often because your head isn’t turned enough towards the target. Head position is important to keep consistent with string alignment.
- Inconsistent hand position. Remember that your best anchor point will be dictated by hitting the rest of your stance correctly. If your draw elbow is parallel to your arrow when drawn, as it should be, you will have a limited hand position. Make sure you find bone-to-bone contact to ensure this hand position maintains consistency.
- Inconsistent head position. This normally occurs in the instance you are trying to ‘reach your anchor’ rather than the other way around. Do not move your head from the notes described in reaching your best archery stance.
- Too much pressure at full draw. If you are unable to hold your anchor for more than a few seconds without shaking, you need to work on your strength. Through practice you will build up the back muscles neccessary to draw back on the bow string.
That’s it!
Happy shooting and read on to understand aiming in the shot sequence.